Amazon Web Services
Cyscale enables you to keep track of and secure your AWS infrastructure natively. You connect your AWS account(s) by creating an IAM role that Cyscale can assume to read your AWS resources.
Connecting Your AWS Account(s)
Once you are ready to connect your AWS account and have the required permissions, navigate to the Connectors page, press Add Connector, and choose AWS. You will be greeted with a simple multi-step process.
Step 1
In the first step, you provide a name for your AWS account to be used throughout Cyscale. This is a plain-text identifier that helps you better manage your resources.
You also provide the external ID. The field is pre-populated by default and there is no real reason to change it other than if you want to use an already existing role. This is a native feature of AWS roles that helps the involved parties establish a more secure connection (see the AWS docs for more).
AWS Organizations
If you are using AWS Organizations with a multi-account setup, you can additionally enable support for it in step 1.
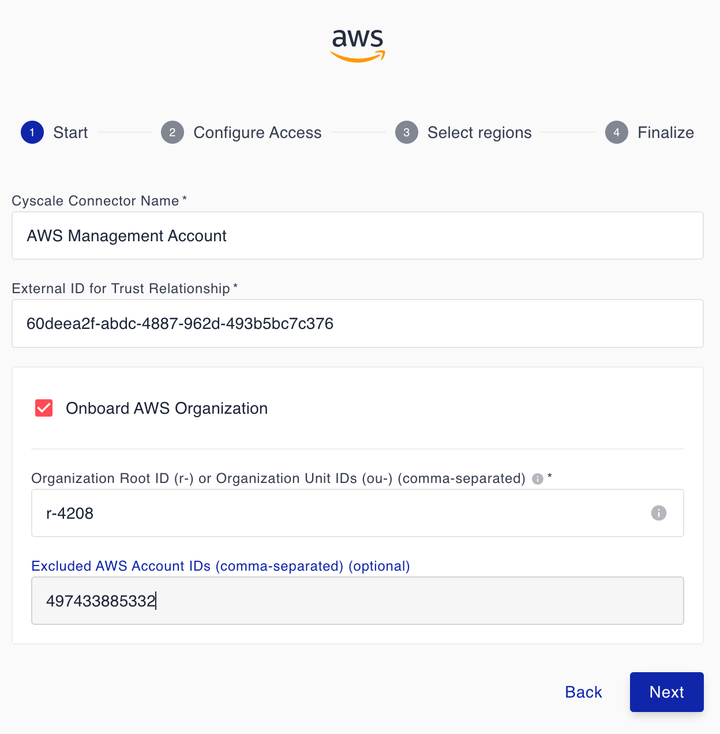
With this, you can onboard the AWS organization management account and let Cyscale automatically discover and connect the AWS member accounts.
You will have to specify either the organization’s root ID (e.g., r-4208) to onboard the entire organization or one or multiple organization unit (OU) IDs to onboard certain parts of the organization.
You can also exclude certain AWS accounts by providing their IDs.
Step 2
In the second step, you create the AWS role. Cyscale gives you multiple ways to achieve this to adhere to your already existing processes.
CloudFormation (Default)
The most straightforward way to create the required AWS role is to use CloudFormation, AWS's native infrastructure as code service.
Besides being simple to use, just like the Terraform option, it provides a great way to manage the lifecycle of the created resources (role, policy). For example, if you decide to remove the connection to your AWS account, you simply delete the CloudFormation stack and all the related resources will be deleted automatically.
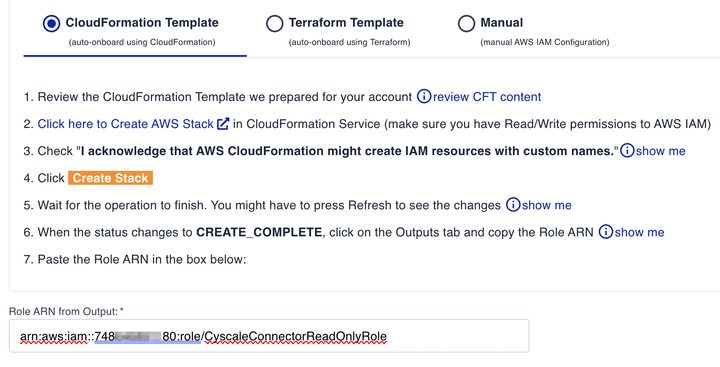
Cyscale comes with a ready-to-use CloudFormation template which you can view either inline (see the image below) or you can download the actual template from here (this is the source of the CloudFormation stack).
When you click on Create AWS Stack, a new browser window will open with the CloudFormation stack ready to be created. You might have to authenticate into the AWS console.
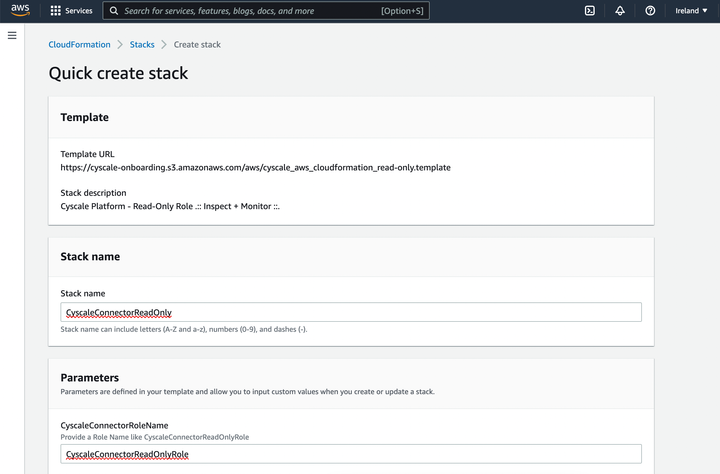
Review the name and the parameters of the stack, check the I acknowledge that AWS CloudFormation might create IAM resources with custom names. checkbox, and press Create stack. Your AWS resources should be ready within a few minutes (state CREATE_COMPLETE). From the outputs tab, copy the ARN and paste it into the Role ARN from Output field in Cyscale, as displayed below.
When enabling the support for AWS Organizations in step 1, CloudFormation becomes the only available option.
The CloudFormation stack, in addition to the IAM role and the custom IAM policy, will contain a StackSet used to provision the same role and policy in all AWS member accounts covered by your configuration from step 1.
The StackSet will automatically deploy to AWS accounts added to the organization (either newly created or invited) through automatic deployments.
The StackSet runs across your AWS accounts using service-managed permissions. If the StackSet creation fails, you might have to enable trusted access.

For a full organization onboarding workflow, see Organization Onboarding.
Terraform
Another option based on infrastructure as code is to use Terraform. If your current workflow leverages Terraform, you might want to choose this approach.
Cyscale generates a ready-to-use Terraform configuration file which you download and run using the Terraform CLI. Inspect the file and, once you are ready, run terraform init and terraform apply -auto-approve.
Terraform uses the provider's APIs/SDKs to manage the resources - IAM role and policy in this case. The Terraform AWS provider can be configured in several ways which you can find here.
Perhaps the simplest option is to let the provider use the credentials stored by the AWS CLI. If you have multiple AWS CLI profiles, you can set the environment variable AWS_PROFILE with the profile corresponding to the AWS account you want to connect to Cyscale.
Manual
If you prefer setting up the resources manually from the AWS management console, follow the steps described in the application.
While the permissions you grant to Cyscale are limited to reading the configuration of your cloud resources, you might still be concerned about the security of your AWS account. Setting the trust relationship with the Cyscale AWS account means that any entity from the Cyscale AWS account with the privilege to assume the role from your account and that has access to the external ID you provided can read your AWS infrastructure.
The Cyscale AWS account (789815788242) follows all the best practices and is continuously secured by Cyscale itself. Furthermore, the external ID is encrypted and stored in a database accessible only by certain services from within the Cyscale infrastructure. No member of the Cyscale team has access to the external ID.
Step 3
In this step, you can select which AWS regions should be covered by Cyscale. By default, all regions are selected. In most cases, you will want to choose the regions in which you have some resources deployed. You can change this after.
All AWS regions have some resources deployed by default, such as the default VPC, default subnets (one for each AZ), and the default security group. These resources count towards your plan's quota.
Certain resources, such as IAM resources (users, groups, roles, policies, etc.), do not belong to a specific region. Cyscale classifies these as global assets.
Cyscale automatically adds the AWS member accounts using the same region(s) you selected for your AWS management account. After this, you can configure the regions individually for each connector.
Deep Dive on Permissions
Since Cyscale connects to your AWS account(s) by assuming the role you create, all permissions are controlled through the policies that are attached to the role.
To benefit from everything Cyscale has and will have to offer, two policies should be attached:
-
SecurityAudit - This is an AWS-managed policy that grants read access to most AWS services. You can read more about it in the AWS documentation and in the AWS console.
-
Custom Policy - An additional custom policy that grants permissions for certain actions/services that are not covered by the Security Audit policy such as
ListTagsForResourcefor EFS andList*actions for S3.
It is important to make the distinction between infrastructure/configuration access and data access. Since Cyscale focuses currently on infrastructure, these policies do not grant permissions to your data. For example, Cyscale can read the configuration of your S3 buckets and objects, but not their actual content - i.e. there is no GetObject permission.
One area you might want to pay attention to is logging. Cyscale will have access to your logs from Amazon CloudWatch. While Cyscale does not process the content of the logs in any way, it is still important to not leak any sensitive information in logs.
AI Security Permissions
If AI Security is enabled for your account, Cyscale may request additional read permissions for AI-related services such as SageMaker and related model, endpoint, feature group, and data-store metadata.
When new AI permissions are needed, Cyscale shows an update-permissions notice in the app and in the relevant connector details. Use the provided Copy updated IAM Policy content action to combine the existing custom Cyscale policy with the new read permissions, update the policy in AWS IAM, then mark the connector as updated in Cyscale and sync it.
See AI Security.
Managing Your Connected AWS Account(s)
Once connected, your AWS account(s) will show up in the Connectors list. From there, you can either use the inline actions or navigate to the overview page of the cloud account. The available options are:
Configure
You can update the following information for your AWS cloud accounts:
- Name - this helps you better identify the cloud account throughout the Cyscale platform
- Role ARN - in case you want Cyscale to use another role
- External ID - if you change the IAM Role, you might also have to provide another external ID
- Regions - from the dedicated tab, you can update which AWS regions Cyscale should cover. This change will be visible after the next sync, which starts automatically after you save. If you remove a region, all assets from that region will be removed from Cyscale.
For the AWS management account, you can additionally configure:
- whether you want Cyscale to automatically onboard new AWS accounts added to your organization
- the parts of your AWS organization you want Cyscale to cover (the entire organization or specific organization units)
- exclude specific AWS accounts
If you add OUs that were not initially covered by the CloudFormation StackSet, you will have to update the CloudFormation stack. When updating, choose “Use existing template” (the default) and update the parameter “OrganizationalUnitIds”.
Disable/Enable
By default, all connectors are enabled. If you want to prevent Cyscale from syncing and assessing your assets for a certain connector, you can disable it. The state of the connector in Cyscale will be locked until you enable it again. The assets will not be updated based on your actual resources and assessments will not be performed for them.
Sync
You can always trigger a new sync and assessment manually for a given connector (unless the sync is already in progress). This will make Cyscale read all your resources for that particular connector, evaluate the applicable controls, and generate any alerts if necessary.
Vulnerabilities
Cyscale pulls vulnerabilities/findings reported by Amazon Inspector (EC2 instances, Lambda functions, ECR images) and ECR Basic Scanning (ECR images). We recommend using them if possible.
Cyscale will show you all findings alongside the CVE ID (and the reference in MITRE), Severity, Affected Packages, Description of the CVE and the Remediation steps.
The findings will be grouped by CVE ID and ordered by Severity in the Vulnerabilities inventory (accessible from the main menu).
You can also check the vulnerabilities for a specific asset by navigating to the Vulnerabilities tab or in the Overview Cards section of the asset.
Severity
A finding severity rating can be Info, Low, Medium, High, Critical or Untriaged. Untriaged findings are those the vendor hasn't yet assigned a score for.
You can read more about how Amazon Inspector computes severity scores.
Mentions
- The Vulnerabilities inventory will be empty until the Amazon Inspector is enabled in one of your AWS connectors.
- Once enabled, you should wait for the next sync or trigger a sync from the Connectors page. Check Getting Started for more details.
- Cyscale will not show findings related to Network Reachability due to their overlapping with our security controls.
- Starting on 19 April 2023, Amazon Inspector supports deep inspection of EC2 instances. It allows you to see vulnerabilities in application packages such as Python, Java, and Node.js.
Service Coverage
The AWS resources that Cyscale can handle are listed in the tables below, along with the number of controls that check their configuration:
| AI/ML | # of Controls |
|---|---|
| SageMakerNoteBook | 3 |
| Compute | # of Controls |
|---|---|
| AutoScalingGroup | 0 |
| ECSCluster | 1 |
| ECSContainerInstance | 0 |
| Function | 2 |
| VM (EC2 instance) | 7 |
| Containers | # of Controls |
|---|---|
| ContainerRegistry | 0 |
| ECRImage | 0 |
| ECRPublicImage | 0 |
| ECRPublicRepository | 0 |
| ECRRepository | 0 |
| ECSScheduledTask | 0 |
| ECSService | 2 |
| ECSTask | 0 |
| ECSTaskContainer | 0 |
| ECSTaskContainerSpec | 0 |
| ECSTaskDefinition | 5 |
| ECSTaskSet | 0 |
| IAM | # of Controls |
|---|---|
| AccessAnalyzer | 0 |
| IAMGroup | 2 |
| IAMPasswordPolicy | 7 |
| IAMPolicy | 0 |
| IAMRole | 3 |
| IAMUser | 11 |
| IAMVirtualMFADevice | 0 |
| SSOGroup | 0 |
| SSOPermissionSet | 0 |
| SSOUser | 0 |
| Integration | # of Controls |
|---|---|
| API | 0 |
| KinesisDataStream | 1 |
| EventBridgeRule | 0 |
| EventBridgeSchedule | 0 |
| MQBroker | 0 |
| SNSSubscription | 0 |
| SNSTopic | 1 |
| SQSQueue | 1 |
| Management | # of Controls |
|---|---|
| CloudAccount | 22 |
| ConfigurationRecorder | 0 |
| EBSSettings | 1 |
| IAMAccountSummary | 0 |
| OrgAccount (SSO) | 0 |
| Trail | 3 |
| Networking | # of Controls |
|---|---|
| CustomDomain | 0 |
| FlowLog | 0 |
| HTTPListener | 0 |
| LoadBalancer | 4 |
| NetworkACL | 1 |
| NetworkInterface | 0 |
| PrefixList | 0 |
| SecurityGroup | 8 |
| Subnetwork | 0 |
| TargetGroup | 0 |
| VPC | 1 |
| VPCLink | 0 |
| Operations | # of Controls |
|---|---|
| LaunchTemplate | 0 |
| LaunchTemplateVersion | 3 |
| MetricAlarm | 0 |
| MetricFilter | 0 |
| Snapshot | 0 |
| Image (AMI) | 1 |
| Security | # of Controls |
|---|---|
| Certificate | 1 |
| IAMServerCertificate | 1 |
| KeyPair | 0 |
| KMSKey | 8 |
| Storage | # of Controls |
|---|---|
| Bucket | 17 |
| Disk | 1 |